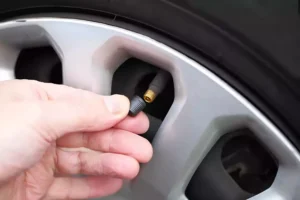


Changing a tire cap is a relatively simple process. Here are the steps to follow:
- Remove the old cap: If there is an existing cap on the valve stem, unscrew it by turning it counterclockwise until it comes off.
- Clean the valve stem: Before putting on the new cap, clean the valve stem with a dry cloth or brush to remove any dirt or debris that may have accumulated.
- Choose the right cap: Make sure to choose a cap that is compatible with your tire’s valve stem. Refer to the vehicle or tire owner’s manual or consult a professional mechanic or tire technician if you’re not sure which type of valve stem your tire has.
- Install the new cap: Screw the new cap onto the valve stem by turning it clockwise until it is snug. Be careful not to over-tighten the cap, as this can cause damage to the valve stem or prevent the cap from sealing properly.
- Check for leaks: Once the new cap is installed, check the tire for air leaks by using a tire pressure gauge or visual inspection. If there are any signs of leakage, such as hissing or a decrease in pressure, remove the cap and check for proper installation or other issues.
That’s it! By following these steps, you can easily change a tire cap and ensure that your tire remains properly sealed and protected from dirt and debris.