


Installing a valve cap is a simple but crucial task that can prevent dust, dirt, and water from contaminating the valve stem. This guide provides three easy steps to properly install a valve cap and protect your valve stem. Regularly checking and replacing valve caps can prevent air leaks and other tire problems.

Installing a valve cap is a simple yet important task as it can protect the valve stem from dust, dirt, and water. Here are some simple steps to guide you on how to properly install a valve cap.
Step 1: Clean the Valve Stem
Before installing a new valve cap, clean the valve stem to ensure it is dry and free from dust. Use a clean cloth or tissue to wipe the valve stem. This can help prevent dust and other particles from getting into the valve and ensure the cap can be fully installed.
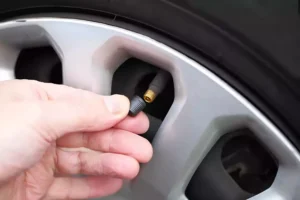
Step 2: Install the Valve Cap on the Valve Stem
Gently push the valve cap onto the valve stem, making sure it fits snugly and locks onto the valve. Some tire valve caps may need to be rotated or twisted to ensure they are securely fastened to the valve stem. Use your fingers or a pair of pliers to gently twist the cap to ensure it is tightly secured.
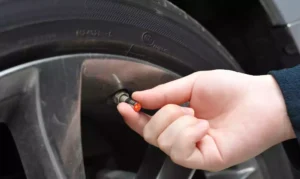
Step 3: Check the Installation
After installing the valve cap, check to make sure it is installed correctly and securely on the valve stem. Ensure the valve cap completely covers the valve stem and there is no looseness or wobbling. If the valve cap is found to be loose, it should be immediately reinstalled or replaced.
If a tire valve cap is missing, the vehicle’s valve stem will be exposed to contamination and corrosion, which can lead to air leaks and other tire problems. Therefore, installing a new tire valve cap is an important maintenance task that should be checked and replaced regularly to ensure the proper function of the valve stem.